Fermentation - it's a beautiful thing, and it needs a special place to occur. In brewing, that's typically in a 60* cone bottomed stainless steel tank. But as many have noticed, or maybe not, stainless ain't cheap. A 27ish gallon s/s conical fermenter runs about a grand, and oh-by-the-way, that's less than half what we need.
Our solution, one used by some homebrewers and nanos, including Hess Brewing, is the use of Induction Tanks. These tanks, from sites like Tank-Depot and USPlastics are made of food grade resin (FDA approved), are UV resistant, lightweight, durable and best of all - yep, affordable. So far at the brewery, we have four 60 gallon induction tanks in use. I think we'll need more, but for now, as we get going on production, four seems to work.
In my research into these conicals, I found that they come in two varieties: full draining and, well, not full draining. Looking at the part number, you can tell the two apart - full draining are cleverly marked FD, for instance ours are INFD60-24. IN (induction) FD (full draining) 60 (capacity) and finally 24. The last number for us was a critical number - in this case, 24 is the diameter of the cylindrical portion of the tank.
For temperature control, we are currently using Glass Door Merchandisers, or GDMs. Both of ours are from True - we have one double door GDM and one single door. These are the same refrigerators you find when you go to your local Gas-n-Sip and grab a Monster Energy drink to go. In fact, both ours came from the local Gas-n-Sip! Each fridge is plugged into a RANCO temperature controller, allowing us precise digital control of the interior temp of the fridge. The 60-24 tanks can just fit, side by side in our double fridge with modifications I'll describe below.
I also found that there are really only two manufacturers of these tanks - Ace Rotoweld is the most widely found and essentially, everyone sells their stuff, and Norwesco. The Rotoweld tanks were closest to a true 60* cone and are fully draining, so that's what we went with. Note that none of them is actually a true 60* - some are actually mislabeled on the websites, but a close look at the technical drawing will show that they are usually less - mine are 57.5* - close enough!
Modifying for brewery use:
I worked on figuring out the fittings for a long time. With help from
Chattahoochee and
Breaker Brewing, we've got a system now that works like a champ.
First, the bottom dump: The tank comes with 1.5" female NPT. Because we had to cut down the stands 2" to get the clearance to fit into our GDMs, we can't dump straight down. Our connections are therefore: 1.5" MNPT/1.5" TC & 1.5" TC 90* & 1.5" TC Butterfly Valve.
The sideport racking valve was a stumbling block for the longest time and I never could find an easy, off-the-rack rotating racking arm - there's probably one out there, but I haven't found it. In the end, I bought 1/2" NPT bulkhead fittings from Tank-Depot - they sell the fittings from an outfit in City of Industry (CA). I chose these because they are the lowest profile - meaning that they protrude less inside - only about 3/8" - and outside the tank - only about an inch. They are threaded for connection on both the inside and outside of the tank. I had to forego the rotating part, but they work great for sampling the wort during fermentation and for pumping from when we move the beer into our brite tanks.
Neither Tank Depot nor Ace Rotoweld were willing to drill the cone for us, so here's how we did it (I must admit that the first time I took a drill to the cone I was a bit nervous -after that, I didn't even hesitate.)
First, I marked the cone - after brewing one batch of IPA with no racking port I had a good idea where the yeast cone would fill to. If if ever came that more yeast was generated, I could always just drop it from the bottom first. So, I chose to go right at the 1 gallon mark. I made sure that the fitting would not overlap the area where the gallon markings are, made an X and broke out the drill.

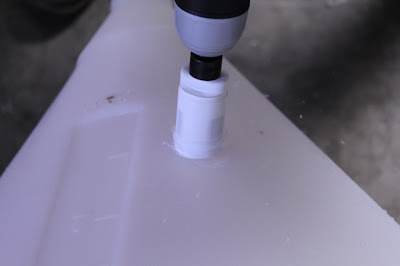
This is the only type of drill bit you should use - for this fitting, it is the 38mm hole saw. Notice it has a center drill to keep the bit from walking.

Go time:

The drill makes quick work of the resin:
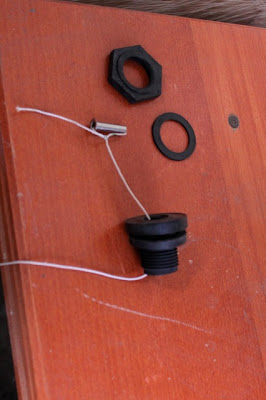
The bulkhead fitting is four parts - the nut, at the top of the below photo, the outside washer slightly below it, and the parts that go inside - the threaded body and a 1/4" thick washer (that fits neatly into a collar to keep it from deforming when you tighten it down).
In order to get the fitting to poke through the cone, I used a piece of string and an old dip tube post. I put the dip tube through the hole I drilled, inverted the cone to let it drop out the lid, then threaded the inside fitting on the string and pulled the string back through the cone:
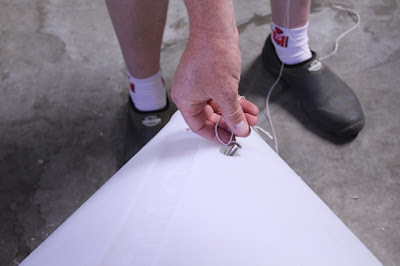
The dip tube post spans the back of the fitting and is used to tug it through the hole you just drilled.

Looking down in the cone, you can see the fitting getting ready to poke through. I'm pulling on the string to keep it tight up against the hole. That's the bottom drain below it.

Once you get the fitting so that it's poking out through the hole, it's a wrestling match to pull it through, but eventually it will:
Then, on with the washer and the nut. Only hand tight! No need for tools - also, note that the threads are left-handed.

From here we screwed a 1/2" NPT/1.5" TCX fitting in, allowing us to then hook on our racking ball valve.
The final result:
The one thing I have noticed about the cones is that the lid ring - the part that the lid threads onto (you can see if four photos up from here), doesn't seal air-tight. In a later post, I may write up how we fixed that - the only reason I would do that is if I decide that I want to push out beer with CO2, instead of pumping it.
During fermentation we are now using FermCap S. I learned the hard way that 9 gallons of head space is not enough! Also, we don't use airlocks - I just put the lid on enough to keep it from getting lifted off and let the tanks breathe CO2 out as they need. You don't need to see bubbles for fermentation to occur!
The only other modification we had to make was lowering the overall height of the stands that come with (or are ordered with) the cones. The only way to get the conicals into the GDM's is if they are already in the stand. Because of low overhead threshold we ended up cutting down the stands' legs. We took 2" out of each leg with a hack saw. To do so, we made a cut about 4" up from the bottom of the leg, then took 2" from the upper portion. To hold the legs intact, a piece of 1/2" threaded steel rod, cut down to 8" length just slips into each lower leg, then the upper half slides over the protruding rod. It's a good fit and the legs are just as sturdy as when they were a solid piece.
Pumping beer to brite tank:
Once fermentation is complete, I attach a 1.5" TC to 3/4" hose barb with hose to my bottom dump and grab about 2 liters of slurry. Then to move to the brite tank, a hose from the racking ball valve, down to the March pump, and into the bottom dump of the awaiting sanitized conical. Make sure you wait until the loop from the source cone to pump to receiving cone is solid beer before you energize the pump so that you don't oxygenate your beer. You can/should also flush the receiving cone with CO2. You should find that the transfer is easy and quick and you will notice no air in the stream of beer as you pump it over.
Kegging:
After a few days in our cold room, the beer is ready for kegging. We use no finings during fermentation at Hess Brewing, but we do use Super Moss in the boil kettle and a whirlpool tank to further separate out trub and other vegetable (hop) residue. 2-3 days at 38* drops the beer clear. A quick dump from the bottom (about a cup or two) purges all the remaining 'stuff'. A hose to the pump, to another hose to a Sanke coupling (with the ball check removed) and we pump-fill the kegs. We fill by weight, knowing the tare weight of our sixtels and 1/2 bbls. All our kegs are purged with CO2 before we pump over (part of the cleaning/sanitizing routine). Like when we pump to Brite, make sure you let the hose to pump to hose get filled solid with beer before you energize the pump so that you don't introduce any unnecessary O2 to your beer.
The kegs go back in the cold room, sit on 40 pounds of pressure for about a day (or you can rock and roll) and are ready to serve.
Edit, as of 4/26/2011
The bulkhead fitting I use is this part number from TankDepot: FAA050PB
We are moving to the INFD110-30 tanks. Since these do not fit inside our GDMs, we built a cold-room for fermenting in. With a window A/C unit set in it, I can keep the room at ~62* and ferment all our ales at that temp.
Those big fermenters are up on casters - McMaster-Carr p/n 2460T85


