Mike, Greg, Mike and Mike.
Well, we made it to San Jose, up to San Fran, out to Walnut Creek and back again all in one piece (well, the brew structure is in two pieces, but that was intentional.) The trip was a lot of fun and a lot of work. Friday we took off at about 6:30 am from San Diego towards San Jose/Redwood City; from there to San Francisco where if you go a few miles east you will hit Sierra Graphic's headquarters.Born in '23
My favorite piece of equipment ever.
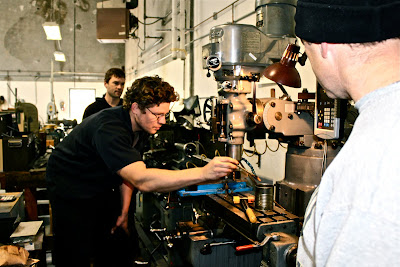
Mike's brother Greg owns Sierra Graphics Services, a printing machinery repair and sales business that has all the machining equipment we needed to build our brew structure. There was one piece of equipment I particularly liked: The 1923 Racine Shear-Cut - it's been around for 87 years and is still going strong. It has this crazy Dr. Seuss/Rube Goldberg mechanical sawing motion that I wish I could show you. You have to see it to believe it.
Cutting through 2x2" Stainless Steel.
Setting the Work.
Engage!
To get Racine to engage you have to throw your shoulder into the silver handle protruding to the right of the arm while simultaneously using your knee to push in the big T-shaped switch AND locking the black knob into the correct position AND locking the wench down. It's a complicated process but it is actually pretty fun.
Big Greg, Mike the Welder and BigJoe
We started building the structure on Friday night after dinner- we cut up the first stick of 304 stainless steel (we used 2x2 with .180 wall thickness) and got the welding station prepared (it involved a large precision machined metal plate, improvised electrical outlets and a BigJoe mechanical lift.)
Here Comes The Sun.
304 Stainless Steel melts at 2,552 degrees Fahrenheit. The weld arc is about the same strength brightness as the sun. Note the crazy masks.
A Very Skilled Mike.
Hot Suede and GemFire.
We had to customize our tippy dump mechanism design when we realized we had ordered about 2 feet less steel than we needed. Some quick thinking and a revised mechanism later we had this:
New Tippy-Dump.
Originally it was going to be a nice triangle because that provides more strength, but then we remembered that these welds can hold up to 70,000 pounds per inch, so I don't think our 1,000+/- lbs will be breaking them anytime soon.Greg Setting Up the Mill.
Mike's Dad, Grinding the Bit.
304 s/s Stainless Spirals.
Clean Up.
We started most days at 8AM and didn't finish up until 10PM. Who knew building a brewery would be so labor intensive? 30 hours of work later we ended up with this:Mike, Greg, Daft Punk, and Mike.
I cannot wait to get the kettles built so we can fire this guy up. What should we call it?


awesome. its great to know people with the right skills. Looks like a serious setup. What are you going to use for burners?
ReplyDeleteYou should call it the Brewinator, of course!
ReplyDeleteSo this one took you 30 hours, but I bet you could build a second one in 10 hours, right? You could start a side business selling these things to other startup breweries. Adding kettles and burners, call it a week of work, probably less than $1K of materials, sell it for $10K?
(And while you're starting up a brewing-manufacturing company, you can also get to work on those CO2 pressure-valve growler caps...)
Mikes,
ReplyDeleteGood times! It was a lot of fun turning four 20 foot sticks of stainless into a functioning "M3G Brauerei". Yes that is the new name-- 3 Mikes a Greg and Brewery in German. It's got my vote.
See you guys soon in San Diego!!
Very cool. Glad to see those plans I saw on Homebrew Forums coming together.
ReplyDelete